1.3. Writing a New ConsoleUser Module
Writing a new ConsoleUser module may require several different steps depending on whether the new module is a new type of module, or just a new instance of an existing type. For example, adding a new version of Firefox requires touching fewer areas than adding a previously unknown application type, like the first FooBarer.
The steps below list all of the changes required to add a wholly new type.
New Custom Window Types (in rare cases)
If a new instance of an existing type (e.g., a new type of web browser) is being added instead of a whole new type, the list is shorter:
Update Unittests (in rare cases)
New Custom Window Types (in rare cases)
Throughout this guide we will develop an example new application. The
example will provide a new application archetype, MicroBlog, which is
most popularly available in the real world as Twitter. This is a web
application where users can login, browse posts from people in their
social circle, create new posts and reply to other posts. In this
example, the service will be provided by a server running Mastodon.
Additionally, the VM we are developing against is running on a machine
named elzar on port 5907 and it is running Windows 7. The
process followed here would be the same for any platform though.
For a thorough account of developing the Mastodon module, see Case Study: Developing a new module for Mastodon.
Examples abound as well. In the ConsoleUser install area (or under
src/ in the source control repo) there are numberous examples of
both abstract and concrete classes. In general, versions with the most
recent application and OS versions will reflect the current best
practices. Most Windows XP modules, for example, are not kept very
current (though all should still work on their platforms).
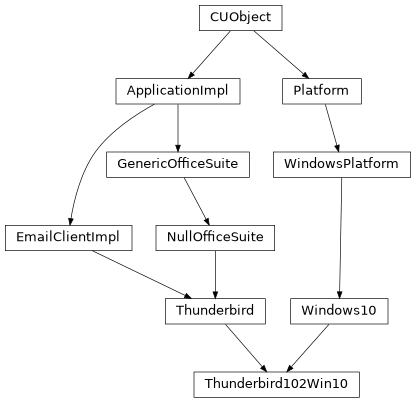
Below is an example of the inheritence diagram for an email client that runs on Windows 10. This structure is typical, but each implementor will decide what is best for their needs.
1.3.1. New Brain Module
The Markov Brain loads a specific module for each type of application the user will use. This brain module is responsible for calling the right method(s) on the User instance, as well as performing any set up or tear down activities. This includes things like generating text for an action to use, choosing which targets to use (e.g., which website to visit or which file to download via FTP), or whatever information an action requires.
The main Markov Brain will handle the decision about which action to perform next, but the module brain has to actually carry it out. It is possible that the action could be composed of several User steps, though in practice it often calls a single User action after preparing whatever information that action needs.
Module brains should be subclasses of ModuleBrain. There are several fields that may be of interest when subclassing ModuleBrain.
Some applications will be able to resume any action in the action
Markov matrix, while others will need to go back to the init step each
time. For example, FTP must open and connect to a server and login
each time, while many steps in WebBrowser can just open a new window
and take their step so explicitly going to the beginning is not
necessary. Any module that wants its transition matrix to be reset
after calls to exit should set self.reset_after_exit = True.
Additionally, a new module may want to override the method is_ready
which determines whether or not the module is available for selection
or not. Most of the time this reflects whether ConsoleUser has been
able to open the assocciated application or not. Some modules may use
this to look for other conditions, including out-of-band information
looking beyond want ConsoleUser can “see”.
1.3.1.1. Completely New Module
This step must be done in its entirety.
1.3.1.2. New Concrete Type
This step is not necessary.
1.3.2. New Application Archetype
The User objects load a generic interface for each type of application that User instance can use. These are implemented using a Bridge Pattern to separate the User-facing interface from the actual implementation.
To add this type, first create a new module with the name of the archetype, e.g., MicroBlog, WebBrowser, or EmailClient. In that module, create a class with the same name that inherits from UserApp. That provides basic implementations of many common tasks. To take advantage of that, the new class should initialize its parent by passing not only the arguments it was created with, but also the factory function (created below) that will create the correct type of instance.
That factory will be called, and its results (i.e., the instance of the
concrete implementation) stored in the self._impl variable. In
general, the methods this archetype defines will call a corresponding
method on that self._impl instance. UserApp provides some of those
already, since virtually every application will want to call open to
launch it, for example.
UserApp also provides a method to make a lot of logging happen
automatically. When calling the method on the instance, it should be
passed to the _run_action method, which can also take other arguments
to affect the log messages if needed.
Looking at the UserApp implementation of open then we can see an
example of how simple actions can be implemented:
@trace_instance
def open(self):
    """
    Try to open the client, which should launch the application if
    there is not one, and may or may not if there is already an open
    """
    return self._run_action(self._impl.open, ())
The _run_action method has two mandatory arguments as seen in that
example, the method to call and the arguments to pass to it (open
does not take any arguments, so that is empty in this example). It can
also take 2 additional arguments if needed. First is name which is
what will be logged in the action log file. If this is omitted or
None the name of the method will be used. The other argument is
extra which is extra information that should be included on the log
lines.
1.3.3. New Unittest Module
Each concrete instance (see below) should have an accompanying unittest that serves both to verify the operation of the module, but also to demonstrate the capabilities.
These allow each concrete implementation to be run directly, that is
without any other brains, with suitable command line arguments. To
aid in processing the command line arguments, unittests should use the
Tester module. In particular, that provides a get_test_user
function that will load the expected command line parameters. This
ensures a common interface for running each module (though additional
config options may be required for some).
That module also provides a convenience wrapper to help running and
reporting for the test cases. To use that, the test function in the
unittest module specifies a list of test steps. These steps are tuples
with the following elements in this order:
Display name for this step (e.g.,
"Post to MicroBlog")Function pointer to execute (e.g.,
user.MicroBlog.post)Arguments to pass to the function (e.g.,
("post content",))Expected return value (e.g.,
True)Whether to break the test if this step fails (e.g.,
True)
Putting that together, we can see an example step from the MicroBlog unittest module:
('Add a comment', user.MicroBlog.comment, (params['firstComment'],), True, False),
This example will print “Add a comment” as the name of the step being
run. It will then call the comment method on the MicroBlog
module of the configured user (from the get_test_user call).
The tester will pass the value at the key firstComment in the
parameters dictionary. It expects to get True back from running
that method, and if it gets anything other than that back the test will
not be aborted and future steps will not be attempted.
Each unittest should expose a function named test that accepts the
following signature:
test(concrete_type, extra_properties=(), test_args='default', skip_args=False)
where the concrete_type is the value that is specified in
user.conf to instantiate the concrete instance being tested.
extra_properties is a list or dict of additional configuration
parameters that should be used when creating the User instance for this
test. test_args indicates which set of arguments this unittest
will use (often there are different sets for different platforms or
deployment environments). skip_args is a boolean that tells the
get_test_user whether or not it should try to get configuration
from command line arguments.
1.3.3.1. Completely New Module
This step must be done in its entirety.
1.3.3.2. New Concrete Type
This step is not necessary.
1.3.4. Update Unittests
In addition to providing a new module to conduct the unittest the Tester module needs to be updated for Skaion’s automated unittest tool. That tool examines modules and compares to different requirements to find suitable VMs/environments that would support running this test. New modules will often require updating the list of available requirements (and potentially annotating VM definitions).
The top of the Tester module defines a number of constants that map to the different platforms, applications, and services that a test might require. The values here are the strings that appear in VM mappings (not a topic covered here).
Whatever new resources the module being developed expects should be added as constants there as well. In our Mastodon example we will need to add a new type of service that can be offered by servers in the testbed, otherwise the ConsoleUser will have no server to interact with.
Even when the automated test tool is not going to be used with a module these steps are useful as they help formalize and document the expectations for this module.
1.3.4.1. Completely New Module
This step must be done in its entirety.
1.3.4.2. New Concrete Type
This step must be done in its entirety.
There may not be any required changes to the existing unittest steps, but the new concrete module should be sure to call the unittest test function when the module itself is executed. In most situations code like the following will likely be useful:
def test(properties=(), skip_args=False):                                          """
    Run the unittest for this module
    """
    import YourArchTypeTester
    return YourArchTypeTester.test(TYPE, properties, 'default', skip_args)

                                                                               if __name__ == '__main__':
    test()
the arguments to the test function there will let the (under
development) automated test tool execute the tests for this module
within its context.
Also, the Tester module import is usually done inside the test
function to avoid circular imports.
1.3.5. New Concrete Application
With the public interface in hand from above we can build the actual classes to drive the new application. This typically happens in at least 3 parts: an abstract parent, a factory function, and the class that actually ties the implementation to the specific tools on the target system (e.g., getting to Mastodon using Chrome 63 on a Windows 7 system).
Regardless of whether it’s implemented in the concrete or abstract
parts, the new module should try to directly interact with the system
as little as possible. In general, moving the mouse to a specific spot
or sending a mouse button down/up event to click on something is more
fragile than using methods like select on a Window object.
The Window object provides many aspects of error checking already.
Additionally, if the underlying system is change, say to AT-SPI which
does not use x, y coordinates for most interactions, the Window can
hide that change from the application logic.
Concrete instances should, therefore, create Window objects that
capture their main window. The instances should then use that object
to find and interact with different elements, instead of using the low
level methods the often presupose a certain mode of interaction.
1.3.5.1. Factory
The UserApp instances above expect to be able to call a factory function with the right arguments to get an instance of the right concrete implementation back. The function will accept the parameters used to instantiate the class along with information about which type of instance should be created.
The utils module provides a generic_factory that will most of the
time provide a good implementation for each concrete type. To use that
function a list of module names that define concrete classes is passed
along with the information about the desired type and the parameters
required to create an instance of that type.
The factory will then load all the candidate modules and check the
TYPE field in each to find the one matching what is desired. It
will then create an instance of the class defined in the matching
module and return that or return None if no matching instance type
is found.
Defining the list of module names in a special variable named
IMPL_MODS will make the new factory match the pattern for other
application types, and allows other automated tools to search and
include the new applications.
1.3.5.1.1. Completely New Module
This step must be done in its entirety.
1.3.5.1.2. New Concrete Type
This step requires only adding the new class/module name to the
existing factory, generally by adding it to the IMPL_MODS list in
the archetype parent’s module. (e.g., a new email client named
“SkaionMail” is being created in a module named SkaionMail.py then
the EmailClientImpl.py file will be modified and the string
"SkaionMail" will be added to the IMPL_MODS list).
1.3.5.2. Abstract Parent
While the actual patterns to look for on the screen might vary, usually
the sequence of steps to achieve a task is reasonably common across
concrete instances. To take advantage of that, each archetype has a
<archetype>Impl module and class as well, for our example that is
MicroBlogImpl. This module is the one that contains the factory
from above.
The class should be a subclass of ApplicationImpl which provides some default implementations and many convenience functions (as does CUObject from which ApplicationImpl descends).
The __init__ of the class should, obviously, call __init__ on
the parent, and should also set up any standard configurations that most
implementations will need. This can include defining sets of patterns
to load that will likely be needed later by various methods.
The new, preferred style to get the patterns loaded is to call
self._update_image_map with a dictionary mapping names the patterns
will be accessed as and the name of the pattern that will be loaded
from disk based on other configuration parameters. Patterns should not
include any file extensions, nor paths. The paths will be determined
by the concrete instance’s setup and other configuration options and
should not be assumed here.
For example, assuming we have a file named titleField.png and we
want to load that and have it available with the name title we
could include the following call:
self._update_image_map({'title': 'titleField'})
later we would be able to access that via self._images['title']
It is possible, of course, to have other abstract parent types. One common way this comes about is when there are many concrete instances of a single general type, but there are many general types of the archetype. For example, ConsoleUser supports many different versions of Outlook and also of Thunderbird, each of which is a type of EmailClient. In that case there is an EmailClientImpl abstract parent as discussed in this section, then there are also Outlook and Thunderbird abstract parents that provide common implementations for how to do the various EmailClient actions for that type.
1.3.5.2.1. Completely New Module
This step is implementation dependent. If you expect multiple versions of a “type” of application (e.g., many concrete Firefox browsers for different platforms) it may make sense to create a common parent to all those similar versions. This class will usually be a subclass of the “Impl” versions of the archetype.
1.3.5.2.2. New Concrete Type
This step is implementation dependent. If you expect multiple versions of a “type” of application (e.g., many concrete Firefox browsers for different platforms) it may make sense to create a common parent to all those similar versions. This class will usually be a subclass of the “Impl” versions of the archetype.
1.3.5.3. Concrete Implementation
The module defining the concrete implementation must also provide some
meta information about itself. There are 3 different module level
variables that should be defined, and which are used by various other
automated proceeds. The first is the TYPE variable, which the
factory above will be checking. The value of this variable should be
what is specified in user.conf to have this module be loaded.
Second, is HUMAN_TYPE which is a human readable string describing
this module, and which will be used to populate the list of supported
applications found at http://skaion.com/ConsoleUserApps.html. Finally,
a dictionary called UNITTEST_CRITERIA defines the features that a
VM/testbed must provide in order to run this unittest. The keys and
constants specified here are part of the Tester module, and if new
platforms or applications are added then those must be added to Tester.
Ideally, all of the logic for how to perform tasks is already provided by the abstract parents. Sometimes one step might be different and so that could be overridden here. The main job of the concrete instance is to provide the correct paths to find the needed patterns for this specific setup, and ensure those are loaded.
To that end, each __init__ method should add the specific path to
the _region_path list of search paths. The concrete class will be
providing the most specific matches, so it should add itself to the
beginning of the list. Often navigating an application will use common
images from elsewhere (like identifying the Start Menu on a Windows
system, or the arrows in the scroll bar). If a pattern is not found in
the first location in _region_path the next will be searched and so
on through the list.
In addition to telling the pattern loader where to look, it must start
the loading processes. Many inherited functions expect that a set of
patterns has been preloaded, and since the parents cannot do that
loading until the path has been set above, this class must initiate it.
So in addition to calling __init__ on suitable parent classes, the
following should be a part of each concrete class (though the path
added will obviously be specific to each).
self._region_path.insert(0, os.path.join('microBlog', 'mastodon', 'win7', 'chrome63'))
self._preload_images()
More and more apps are done in browsers these days. Some of these include our micro blogging example and other social media, along with webmail and other communication tools. Many of those web apps share common workflow tasks, like logging in by selecting a username field, then password, then submitting it. Many also have application menus that have to be expanded to access many features.
While the browser may render things differently, interacting with those
sites share many common elements. To help build ConsoleUser modules
for these sites, new concrete classes (and usually their abstract
parents) should inherit from WebAppImpl. Specifying
self._browser_type in __init__ before initializing the parents
will trigger the instantiation of the right type of browser and making
that usable by the new class via self._browser. The value of
self._browser_type should be the TYPE value of the module
defining the desired browser instance.
1.3.5.4. Completely New Module
This step must be done in its entirety.
1.3.5.5. New Concrete Type
This step must be done in its entirety.
1.3.6. New Patterns to Match
ConsoleUser works very much like expect which lets a program wrap a
text-based program to control it as though a person were using it.
Expect matches patterns and can send input that the program receives as
though a person were sending it. ConsoleUser works just like that, but
using graphical environments instead and wrapping the system instead of
a single program.
Knowing what patterns we’re looking for is a big part of adding support for a new application. While the nature of the patterns depends on the way ConsoleUser is connecting to the system (e.g., when using the AT-SPI interface they are specified as the lookup paths through the object hierarchy), most commonly ConsoleUser connects via RFB (VNC) and so gets a copy of the screen as an image file. The patterns ConsoleUser tries to match in this situation are also image files.
The process for this is to use ConsoleUser’s tool to capture what the screen looks like to ConsoleUser. Then we’ll use a tool like Gimp to identify the areas of interest, like buttons, fields, indicators that some state has been entered, and so forth.
While doing it with Mastodon, we will want to capture images that tell us where to click to enter usernames, where the login button is, how to start editing a new post, where to click to enter the text of the post, how to submit the post, how to logout, etc. Most applications will have similar lists.
It is important to use the tools provided to take screenshots as ConsoleUser scales the color palette lower than most displays in order to make searching easier. This does, unfortunately, make it hard to find good areas to click at times as things that are visible to a real user disappear for ConsoleUser.
Capturing images generally requires both a terminal running the
capture.py tool, and a VNC window so you can actually interact with
the program and get the screens that we need to capture. The capture
saves a screenshot each time Enter is pressed, so using the VNC
window drive the application through the tasks ConsoleUser will be able
to do, and grab screenshots at each point where there is something to
see or do on the screen. The image below shows an example of doing
that.

The capture tool and VNC window the user sees while capturing
And below we see what the ConsoleUser sees for that same screen after the capture tool. Note how many of the color differences are lost, and so how much harder it can be to find the correct regions to click.
Those differences are what make this part of the process one of the more difficult parts.

The image produced by the capture tool from the step shown above
ConsoleUser provides convenience functions for clicking inside or beside matched areas. New modules should use those functions, because that will make it easier to support the applications using the same code if the underlying system changes. In that case, the region identifiers will change, but everything else should “just work.” In this example, the “Log In” button is straightforward, and grabbing a box around that text will be easy to identify the button to click.

The region used to identify the log in button
Finding the area to enter the Username is trickier in this one. The text that we would want to click on shows up in 2 places. We’ll use a bigger region, then have ConsoleUser click beside the match, as though we are grabbing the label associated with a field.

Area that is a “label” for the username field
Continue this process for all of the images that are needed for the new application. This can also include some that are indications that the application is busy, and ConsoleUser should wait until it’s done. Others can be indications that there is a message to read or similar, all the things a user will need to know to use the parts of the app that ConsoleUser will interact with.
Because Gimp stores the files as though a human would want to look at
them again instead in the stripped down ConsoleUser version we need, we
must convert the patterns we just saved. In the tools/ directory
Skaion provides a tool allConvertImgs.sh that takes 2 arguments.
The first is the directory containing sources that need to be
converted, i.e., where we just saved the files, and the other is where
to put them after they are converted. This will be the directory under
images/qemu (or whichever system type) where ConsoleUser will load
them later.
Some existing modules have checklists of the patterns that the current abstract parents expect. In some situations providing these patterns will be enough to implement the new concrete module. Those checklists are found at Useful Checklists.
1.3.6.1. Completely New Module
This step must be done in its entirety.
1.3.6.2. New Concrete Type
This step must be done in its entirety.
1.3.6.3. Anti-aliasing
One particular issue that gives ConsoleUser problems with matching patterns is anti-aliasing. In an effort to make the screen look more pleasant to a human, many systems will blur the edges of things like window borders and letters. This makes pattern matching very difficult since we compare pixel-by-pixel.
Skaion developed a strategy for dealing with that problem as well, and
have a tool to make our image files more resiliant. This tool takes
an image as output from the allConvertImgs.sh tool and applies
another transformation to it. When this tool is needed, the output
directory from allConvertImgs.sh should be an intermediate
directory instead of the final location under images/.
alias-proof.py takes several named arguments. This accepts a
-h option to see help about the command. One of the arguments is
the “main” color we want to match. This is a number that ConsoleUser
will find when loading the pixesl of the image and treating it is a
numpy array. While it’s possible to load one by hand from a python
shell, most of the time the colors to match are black or white, so this
command accepts foreground color arguments of BLACK or WHITE.
In addition to the color of interest, it needs to know where to find
the file to make anti-alias proof. This is given by the -p
argument which accepts the path to the file to process. Without any
other arguments the output will replace the file at that path. To
save to a different location the -o option and destination path
must be given.
1.3.7. New Custom Window Types
Most new applications will not require adding a new type of Window as the default for the platform will suffice. Some applications do use their own windows though, with different styles than the platform uses, or sometimes a new Platform is being supported. In those cases it may be necessary to create a new type of Window.
1.3.7.1. Completely New Module
This step is not always needed.
1.3.7.2. New Concrete Type
This step is not always needed.
1.3.7.3. Window Edges
Using the Window to find and interact with elements helps preserve the abstraction of the System objects, so if a different System is used that doesn’t have images or x, y coordinates things will still be able to find and click what they need.
The main first task of a Window then is to recognize itself and its bounds. Typically, the “X” button helps us find the window that has focus, and also is close to one of the corners (upper right on Windows). Finding the corners is key. At a minimum, finding the corners on a diagonal will be enough, but if we can find all 4 it can help ensure the best match. Not all windows have recognizable borders though, so sometimes we have to make due with what we can find.
The method that is called to do this is find_window_edges. After
this is called, the Window should know its own bounds and be ready to
handle requests to operate on patterns within it. Most new Window
objects will not need to implement this on their own, but it may be
necessary to capture new patterns (see :ref:new_cu_images) to match the
corners. These are, hopefully intuitively named, cornerUpperLeft,
cornerUpperRight, cornerLowerLeft, and cornerLowerRight.
If that method is implemented in the new class, at the end the instance
variables upper_left, upper_right, lower_left, and
lower_right should be set to suitable values to bound the window.
For the common case of NumpyRegions as is typical with the VNC
connection these will be tuples of x, y coordinates of that corner.
All corners are relative to the “origin” of the coordinate system. The point (0, 0) is located in the upper left of the screen, and the coordinates ConsoleUser uses are rows and columns of pixels away from that (all positive numbers).
1.3.7.4. Window State
Windows also are able to “recognize” themselves, to say whether they are currently on top. Typically this is done by grabbing at least a part of the title bar and matching that when asked.
Since actions taken in the application can change the title (e.g., in
a web browser the current page is often included in the title), so an
application can tell the Window to update itself by calling
save_state. This should make sure that the bounds of the window
are still as expected, and that the window will be recognizable on
future calls.
Using this saved state, the Window can be queried about whether or not
it is currently visible and focused, by calling has_focus. If it
does not, the application can call get_focus, the default
implementation of which presses ALT-TAB with assorted number of
TAB presses until it finds itself on top or gives up on the
number to try.