1.4. Case Study: Developing a new module for Mastodon
This page captures the experience of writing a new ConsoleUser module for a new type of application. In this case, we are developing a module to interact with the Mastodon micro blogging service. The client will be a Windows 7 machine using a browser we already have ConsoleUser support for, Chrome 63. The steps here will mirror the ones documented in Writing a New ConsoleUser Module, but will include discussion of how those steps are put into practice in an actual module as well as highlighting many of the decisions and thought processes that resolve them.
1.4.1. What can it do?
The first step is to figure out just what the service can do and what parts we want ConsoleUser to do. Mastodon is a site that lets you do at least the following things:
Create accounts
Delete accounts
Update various aspects of the user’s profile
Post short content
Search for content
Read content that was posted
Respond to content that was posted
Follow users
Unfollow users
Search for users
Send direct messages (DMs) to users
ConsoleUser can be simplified if we assume that the user accounts exist and that we can know in advance what they are, so we will skip over the items that deal with the user accounts. The rest of them about posting content, reading/searching/responding to content, and following or unfollowing users are candidates to keep in.
Those tasks will drive most of the rest of the development process.
1.4.2. Grab Images
Generally, my first step with this is to actually use the new
application on the target system while running Skaion’s capture.py
tool to record the screen as ConsoleUser will see it at each step. To
do this I start the tool, assuming the target VM is running on a
hypervisor named elzar on port 5907, by running the following:
cd consoleUser/tools
./capture.py elzar 5907 win7/mastodon-1-
This will connect and then every time I hit ENTER it will capture a
new screenshot and save it with the next number (starting with 0 the
first time) added to the string that’s the last argument. The first
screenshot I take will be saved in the win7/ directory and will be
named mastodon-1-0.png and the next is mastodon-1-1.png and so
on.
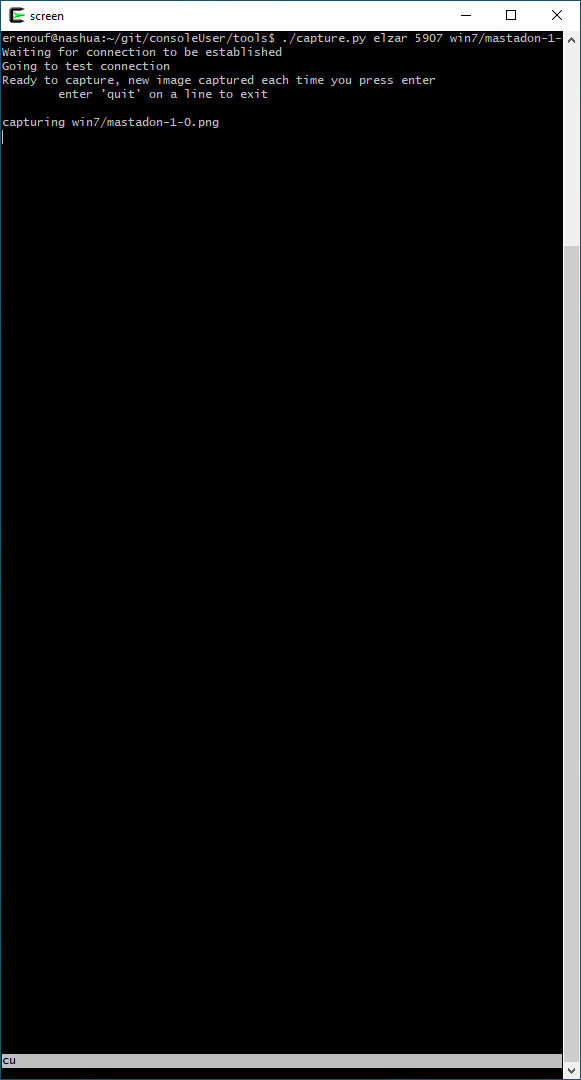
Capture tool after capturing first image
From there I connect with a VNC client (using a Shared connection) that lets me drive the application. In this case I’ll start with opening the browser–but we do not need a screenshot for that since using the browser is something ConsoleUser already has built–and going to the mastodon page. We definitely want a screenshot of this one, since this is where using the application begins. This has the login fields and button for example.
After logging in as user (account creation can and should be done out of band per our decisions above) I can go through all the actions we want ConsoleUser to be able to do, usually grabbing screenshots of “before” and “after” each step so we’ll be able to find what we need on the screen to do each step, and sometimes we’ll need to know what to look for to know it’s done. Also, some tasks will require multiple screens so we need to grab them for each step along the way. We’ll also want to get screen shots that include any menus we use for navigating and the like.
After gathering all of the screenshots, we have to create a library of just the regions we need to match while using the app. This generally is a two step process. First, we use an image editor, at Skaion we use the Gimp, but others may also work. With this we’ll select the regions of interest and save them as PNG files. After that, we’ll convert them to use the color map that ConsoleUser expects by running other tools Skaion provides.
Because ConsoleUser scales down the color depth to reduce the load both on the network and when processing the screen to find matches, sometimes the regions of interest can be difficult to identify or choose. For example, in the figures below, it is straightforward to see the boxes to enter the login name to a human view, but the lines disappear in the ConsoleUser version. This is much of the art of image capturing, finding matches that are going to be the same every time ConsoleUser visits the page and also reliable identify the area of interest.

The capture tool and VNC window the user sees while capturing

Prepared to identify screen regions for logging in
Some images are really easy to identify though. In the same figures the “Login” button is clear and easy to grab. That uses the style of image matching that is the most straightforward: find a region and then click somewhere inside it. As noted with the login name field, we would have a hard time finding such an area (since the “E-mail Address” text appears in multiple spots on the screen). We will have to do something different here. Instead of matching a region that we will directly click, we will grab a region beside the region we’re going to click. In this case if we take a portion of the paragraph that begins “With an account on” and the “E-mail Address” text (or part of it) we will have an area that when matched we’ll know to click just to the right of it.
Below the “easy” step is shown. I draw a box around the Login button and copy/paste that into a new image that will become the one ConsoleUser tries to match. Below that is the candidate image we grabbed to know where to click to enter the login name.

Drawing a box around an image region of interest
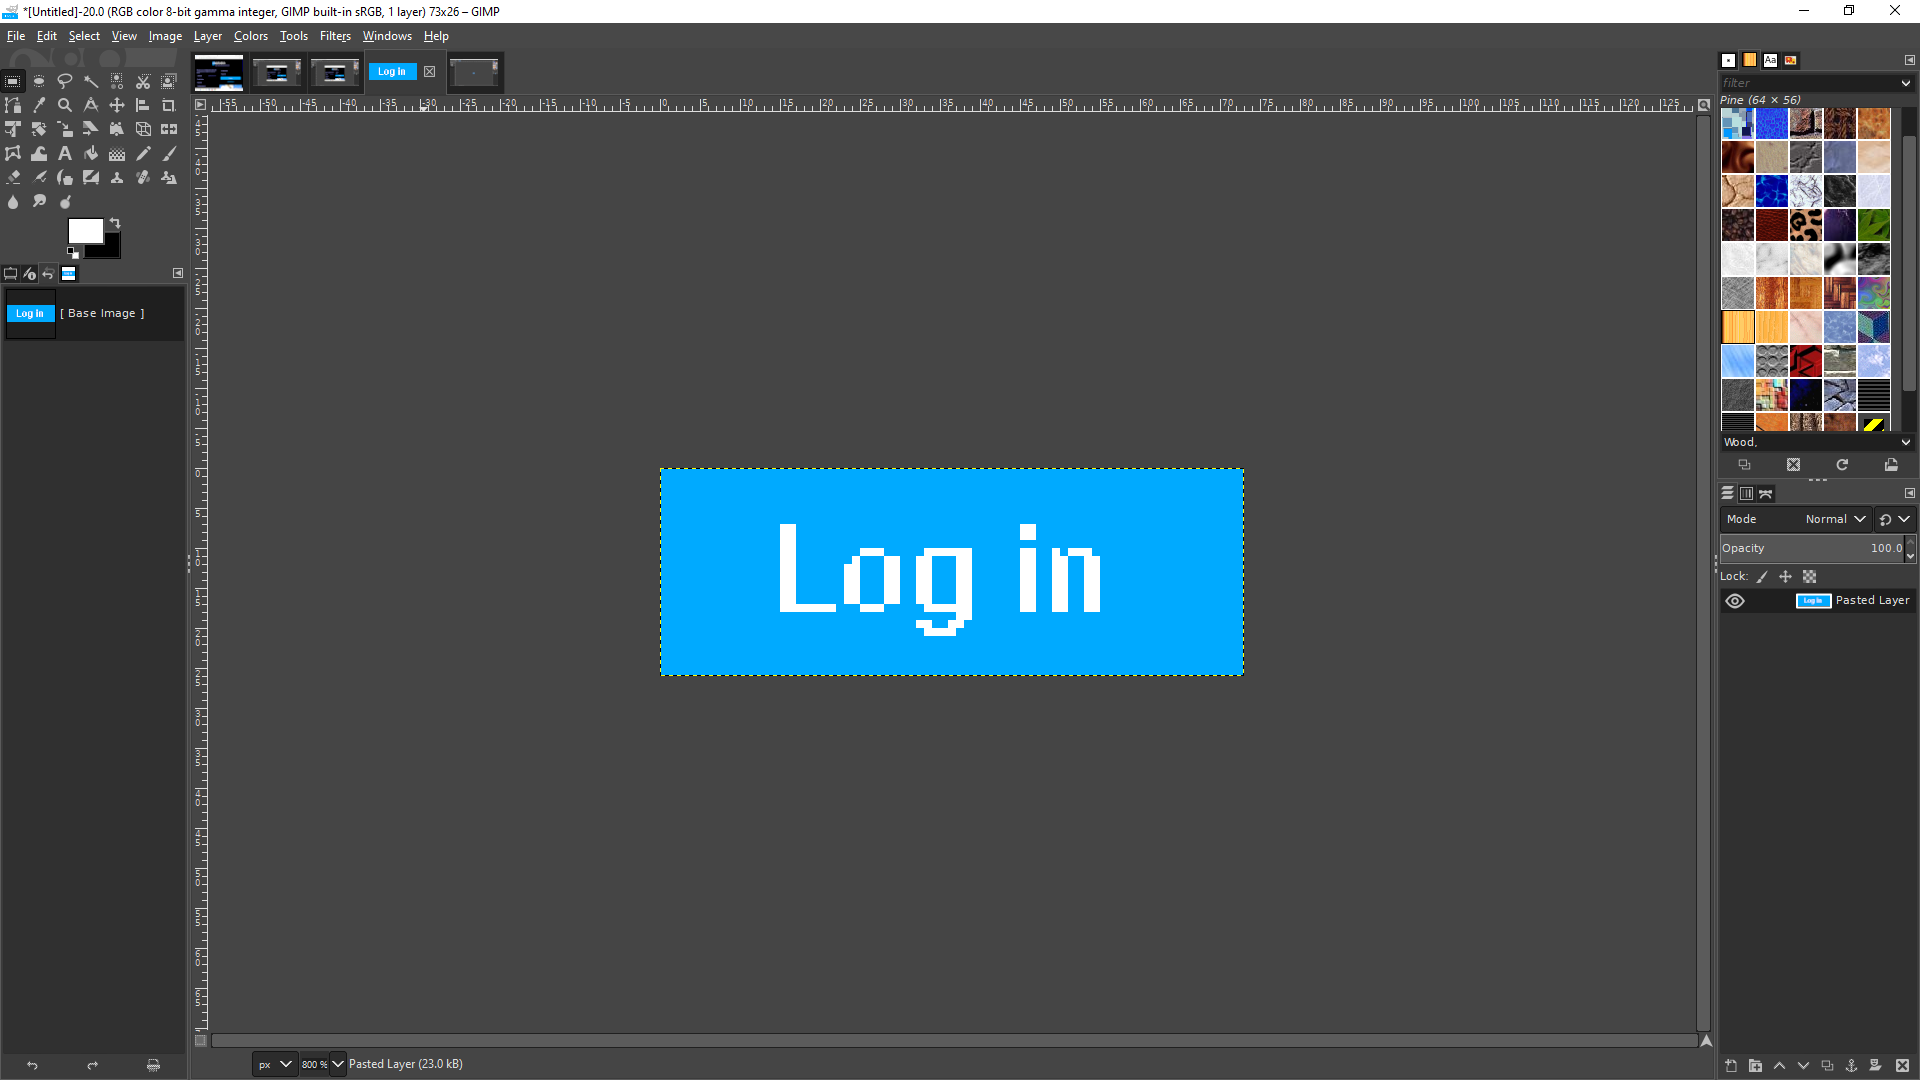
The resulting image from the copy/paste (zoomed 800%)
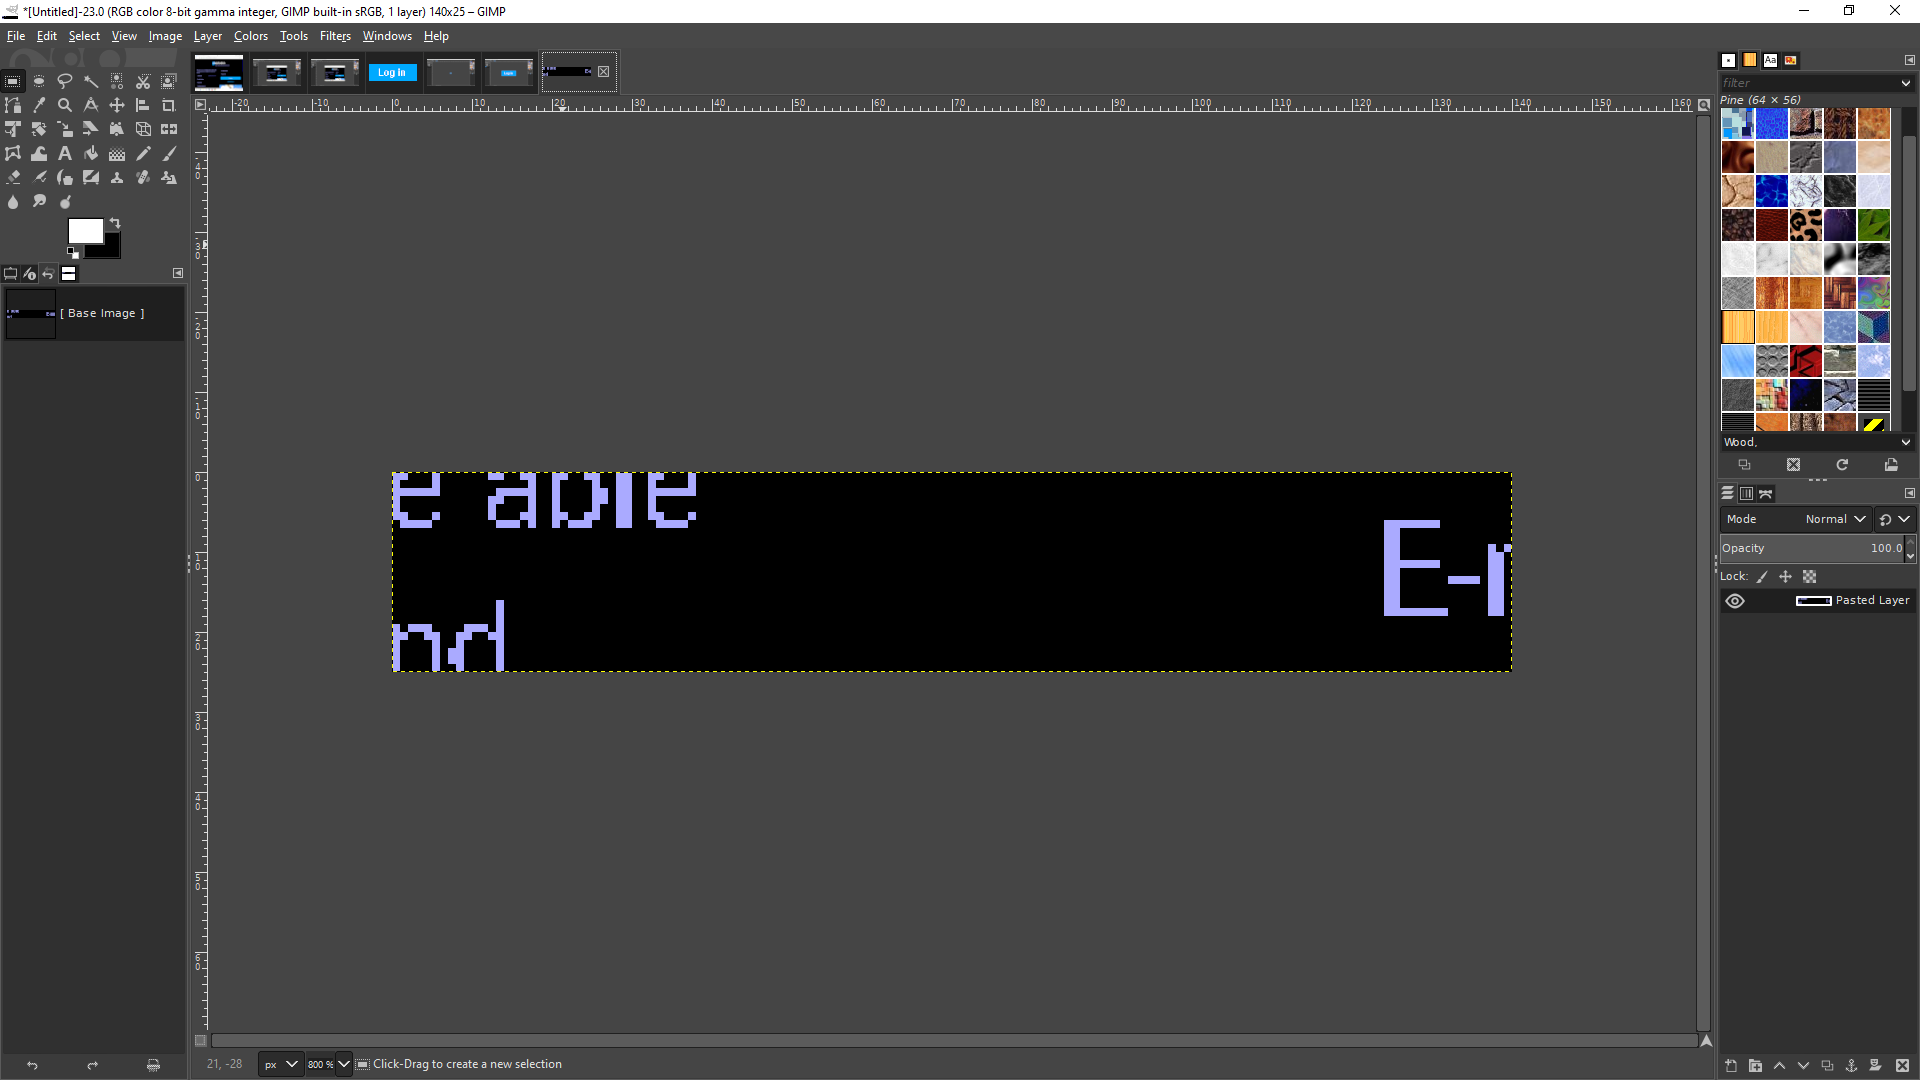
The resulting image for the login field (zoomed 800%)
This process repeats for all of the screens until we have our library
of images that will show ConsoleUser which parts of the screen to
interact with. When capturing them we save them as PNG files (in the
Gimp use Export to do so, and accept the default options). Because the
images need further processing I’ll usually put them in a directory
under tools/ that I name raw. That directory name isn’t
important, but it will be easier to have all of the images for the
application in the same directory (with some occasional exceptions if
the image is part of the OS instead of the application or similar).
The names of the files should be meaningful, and on occasion will
already be defined elsewhere.
In this example, we’re developing a web application, so will likely
want to take advantage of the existing WebApp class. That class
provides general code to handle logging in and out and so forth, but
naturally expects things to have a predictable name. In this case, the
login button must be named loginButton.png (with that
capitalization) and the login name field is loginNameField.png.
To find what images are going to be loaded by a class you can usually
look at either things loaded in the _preload_images method or the
entries (the values) in any call (in __init__) to
self._update_image_map. The values in that dictionary will not
have the file extension on them because ConsoleUser supports other
types of region identifiers. In our example all will be .png
files.
The following is the first batch of images we expect to need. There’s always a chance as we start writing that we will find some others we need, and if so we’ll grab them then. In the mean time, we’ll make a directory in the standard image library to put this, then convert these “raw” images to ConsoleUser-ready ones.
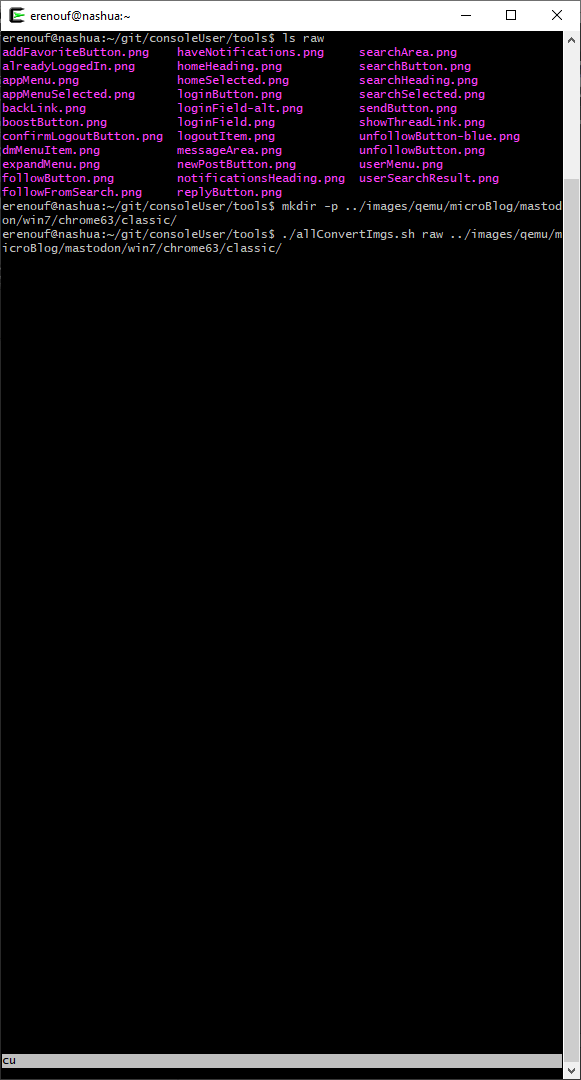
Converting the images after creating a home for them
1.4.3. Define Interface
We now need to define the public interface that User objects will be able to access. This is the part of the library that exposes all the tasks we want this application to expose.
This step can be done before or after the image capture step, and in practice I often go back and forth between them.
This step is writing new Python code. We’ll create a class with our
abstract type name, so here we’ll create a class named MicroBlog.
That class should also be in a module with the same name, since
ConsoleUser loads things automatically and expects the module and class
names to be the same.
The class should be a subclass of UserApp, and in our case since we’re doing a web app we’ll inherit from a subclass called WebAppUserInterface.
We are also going to need the Logger module, and in particular we’ll
want the trace_instance decorator from it.
Setting aside for now comments and the like, the start of our
MicroBlog.py then will look as follows:
from Logger import trace_instance
from WebAppUserInterface import WebAppUserInterface

class MicroBlog(WebAppUserInterface):
All UserApp instances have to use the same __init__ prototype, and
will naturally call their parent’s init with the expected information.
Some of that information is what Factory should be called to get a
concrete instance that implements this interface. We will define that
later in the implementation side of our Bridge pattern, but since we
know it’ll be there, we can add that to our imports as well.
Accepting a System and UserConfig instances as arguments, along with an optional argument to override the concrete instance type, we’ll update the current body of this module to become:
from Logger import trace_instance
from MicroBlogImpl import get_micro_blog
from WebAppUserInterface import WebAppUserInterface

class MicroBlog(WebAppUserInterface):
    def __init__(self, system, config, btype=None):
        super(WebAppUserInterface, self).__init__(system, config, get_micro_blog, btype)
Now we can start defining the actual interface for the MicroBlog type. Each method defined here will be one of the tasks above, and this class will be rather short as we’ll use the convenience wrappers from our parents to execute most of the calls/logging etc.
UserApp provides access to the concrete implementation via
self._impl, and provides a wrapper to run the methods called
self._run_action which takes the method to call and the arguments
to pass as mandatory arguments. It will also accept an alternate name
to use in logging (default is the method name being called), and any
additional information that should be included when logging messages
about this call. Often those last two arguments are not needed.
From the tasks above we are going to provide an interface that lets the
User post, search, follow, unfollow, send_dm,
read_random, and comment. For debugging purposes we want to be
able to trace the execution through each method if need be, so we will
decorate them each with that capability from the Logger module. This
then gives us the complete module as follows:
# Copyright (c) 2021 Skaion Corporation, www.skaion.com

"""
MicroBlog
---------

This Application type represents using a micro blogging service, most
popularly exemplified by Twitter.  This lets users connect, share
messages publicly or privately, and read and respond to other posts.
Posts are short, unlike long-form blogs which are provided by the Blog_
module.
"""

# 3rd party/standard library imports

# our imports
from Logger import trace_instance
from MicroBlogImpl import get_micro_blog # factory to create instances
from WebAppUserInterface import WebAppUserInterface

class MicroBlog(WebAppUserInterface):
    """
    This interface defines how a User_ can interact with a micro
    blogging site, such as Twitter.

    Parameters:

    - `system`: a :doc:`System` object to communicate with the target system
    - `config`: a :doc:`UserConfig` object holding all our configuration
    - `btype`: optionally the (string) name of the type of client to create, overriding anything in the config object
    """
    def __init__(self, system, config, btype=None):
        super(MicroBlog, self).__init__(system, config, get_micro_blog, btype)

    @trace_instance
    def post(self, content):
        """
        Create a new post using the given content.
        """
        return self._run_action(self._impl.post, (content,))

    @trace_instance
    def search(self, terms):
        """
        Search the site with the given search terms.
        """
        return self._run_action(self._impl.search, (terms,))

    @trace_instance
    def follow(self, name):
        """
        Find the user with the given name, and start to follow them.
        """
        return self._run_action(self._impl.follow, (name,))

    @trace_instance
    def unfollow(self, name):
        """
        Find the user with the given name, and unfollow them.
        """
        return self._run_action(self._impl.unfollow, (name,))

    @trace_instance
    def send_dm(self, recip, content):
        """
        Send a direct message with the given content to the specified
        recipient.
        """
        return self._run_action(self._impl.send_dm, (recip, content))

    @trace_instance
    def read_random(self):
        """
        Read a random posting from the feed.
        """
        return self._run_action(self._impl.read_random, ())

    @trace_instance
    def comment(self, content):
        """
        Add a comment to the currently read post a.k.a. reply to it.
        """
        return self._run_action(self._impl.comment, (content,))
1.4.4. Writing the Unittest
In a nod toward TDD, I will often build the unittest next. This will not only give me feedback on which features are done and which are not, but it also serves as the may way to exercise the new module to see it in action.
This module will execute the interface defined above, and should work the same (generally) regardless of what the implementation is. The tester will use the same factory as the interface class, and will execute each of the methods at least once with appropriate input.
Many tests take the module’s word for it if they succeeded or not. That is, the return value is really what is tested, not the real effect on the system/network. With additional work those things can be tested, but in general the user will watch the test run to see if it is doing what is expected.
Unittests use the functions provided in the Tester module. These provide functions to read command line arguments, load a suitable User object, and to execute the steps of the test while recording the results.
The function prototype for each unittest module will be the following:
def test(instance_type, user_properties=(), test_args_key='', skip_args=False):
where the instance_type is the value that a user will put in the
config file to get the instance type being tested. The
user_properties is a tuple of stings of key=value pairs, which
can be overridden by command line arguments. The test_args_key is
used because many unittests will support different types of tests,
e.g., using an Elgg server or a Friendica one. This allows the caller
to provide information about which test should be run. The
skip_args parameter is usually only used by the automated tester to
provide the full user config via the properties and not have the tester
think it is an error to be missing command line parameters.
After setting up our user we just have to create a list of the test
steps that are each a tuple of the method to test, the arguments to it,
the expected value, and whether this step failing means we should abort
the rest of the test. As noted above, we can expect that there will be
different environments or configurations that will be tested with
MicroBlog instances in the future, so we’ll setup a dictionary with the
parameters the test will use, then the test_args_key argument can
pick the right set at runtime.
The only remaining consideration is what order to call the steps in to gain our confidence that things are right. Obviously, some steps must come before others. In Mastodon, for example, we’ll have to login before we can create a post. Balancing those things, we’ll use the following sequence:
open
login
create a post
read a random post
comment on a post
Search for a user
follow a user
send a DM to user
unfollow a user
logout
login again (so we can test that “exit” also does this part)
exit
So with that sequence of steps as our goal the completed unittest module looks like:
# Copyright (c) 2021 Skaion Corporation, www.skaion.com

"""
MicroBlogTester
---------------

The unittests for all :doc:`MicroBlogImpl` subclasses are basically the
same, so this serves as a common unittester for each of them.
"""

# standard library/3rd party imports
import time

# our imports
import Tester

__docformat__ = 'restructuredtext'

arguments = {
    'default': {
        'microBlogLoginName': 'agaring',
        'microBlogLoginPass': 'password',
        'microBlogBaseURI': 'http://mastodon.com/',
        'microBlogLoginURI': 'http://mastodon.com',
        #'firstTitle': 'The Guid',
        'firstPost': 'We already know what the answer is\nbut who knows ' +
                ' what the question could be?',
        'firstComment': 'good point',
        'firstSearch': 'interesting stuff',
        'toFollow': 'agaring',
        'dmRecip': 'knam',
        'dmContent': 'This is a message just for you.',
    },
}

def test(blog_type, properties=(), args='default', skip_args=False):
    """
    Unittest that verify that an implementer completely and (hopefully)
    correctly implements the :doc:`MicroBlog` interface

    Parameters:

    - `blog_type`: the type of :doc:`MicroBlog` to test
    - `args`: the key into the arguments dictionary specifying what arguments to
            use during the test
    - `properties`: a sequence of additional configuration options for the test
            :doc:`User`
    - `skip_args`: whether the :doc:`User` constructor should skip command line args
    """

    props = properties or {}

    try:
        list(props.keys())
    except AttributeError:
        props = Tester.convert_to_dict(props)

    params = arguments[args]

    props['apps'] = 'MicroBlog'
    props['MicroBlogType'] = blog_type

    # below, do not use properties.update( params ) because the content fields
    # in params will make the resulting config file unparsable, so only use the
    # keys that should actually belong to the User object
    for key in ('microBlogLoginName', 'microBlogLoginPass',
            'microBlogBaseURI', 'microBlogLoginURI'):
        props[key] = params[key]

    user = Tester.get_test_user(props, skip_args=skip_args)

    # give the connection a moment to settle before trying to plow ahead
    time.sleep(2)

    # TODO do we need to do anything to "prep" the server or similar?

    test_steps = (
        ("Open blog", user.MicroBlog.open, (), True, True),
        ("Login", user.MicroBlog.login, (), True, True),
        ('Create new post', user.MicroBlog.post, (params['firstPost'],),
            True, False),
        ('Read post', user.MicroBlog.read_random, (), True, True ),
        ('Add a comment', user.MicroBlog.comment, (params['firstComment'],),
            True, False),
        ('Search the site', user.MicroBlog.search, (params['firstSearch'],),
            True, False),
        ('Follow user', user.MicroBlog.follow, (params['toFollow'],),
            True, False),
        ('DM user', user.MicroBlog.follow, (params['dmRecip'],
            params['dmContent']), True, False),
        ('Unfollow user', user.MicroBlog.unfollow, (params['toFollow'],),
            True, False),
        ('Logout explicitly', user.MicroBlog.logout, (), True, False),
        ("Login again", user.MicroBlog.login, (), True, True),
        ('Exit', user.MicroBlog.exit, (), True, True)
    )

    passed, failed = Tester._run_unittest(user, test_steps)
    return passed, failed
1.4.5. Implementing the Interface
Now that we know what we need to build, and what to look for along the way, we can start writing the code to actually do it.
In general, all implementations will derive from ApplicationImpl, which itself derives from CUObject. Most of the time there will be one or two other purely abstract classes between those and the actual concrete instance. For web applications, like Mastodon, we will inherit from WebApp.
The module that defines the factory for each application type also provides an abstract class that provides the stubs of the interface we created above. Often there will be common implementations that work across many versions of applications, just looking for different regions. When that holds this class can provide the basic implementation and subclasses can override that if they need to do it differently.
Defining that factory and just carrying the interface forward, but failing to do each task looks like:
# Copyright (c) 2021 Skaion Corporation, www.skaion.com

"""
MicroBlogImpl
-------------

This Application type represents using a micro blogging service, most
popularly exemplified by Twitter.  This lets users connect, share
messages publicly or privately, and read and respond to other posts.
Posts are short, unlike long-form blogs which are provided by the Blog_
module.
"""

# 3rd party/standard library imports

# our imports
import utils

from Logger import trace_instance
from WebAppImpl import WebAppImpl


# list of names of modules that can be concrete classes
IMPL_MODS = (
    'MastodonChrome63Win7',
    'MastodonChrome63Win10',
)

def get_micro_blog(system, config, blog_type=None):
    """
    This is the Factory_ function to construct the correct type of
    :doc:`MicroBlog` instance for the given config.

    Parameters:

    - `system`: a :doc:`System` object which connects to the system on which the client runs
    - `config`: a :doc:`UserConfig` object containing this User's config
    - `blog_type`: optionally the type of the client to create, overriding anything in config

    .. _`Factory`: http://en.wikipedia.org/wiki/Factory_pattern
           """
    config.logger.trace("starting get_micro_blog")

    b_type = blog_type or config.MicroBlogType

    ret = utils.generic_factory(IMPL_MODS, b_type, system, config)

    if not ret:
        config.logger.elog(f"Unable to create a MicroBlog for {b_type}")

    config.logger.trace(f"ending get_micro_blog: {ret}")
    return ret


class MicroBlogImpl(WebAppImpl):
    """
    This interface defines how a User_ can interact with a micro
    blogging site, such as Twitter.

    Parameters:

    - `system`: a :doc:`System` object to communicate with the target system
    - `config`: a :doc:`UserConfig` object holding all our configuration
    - `btype`: optionally the (string) name of the type of client to create, overriding anything in the config object
    """
    def __init__(self, system, config):
        super(MicroBlogImpl, self).__init__(system, config)

        self.base_uri = self.config.microBlogBaseURI

    @trace_instance
    def post(self, content):
        """
        Create a new post using the given content.
        """
        return False

    @trace_instance
    def search(self, terms):
        """
        Search the site with the given search terms.
        """
        return False

    @trace_instance
    def follow(self, name):
        """
        Find the user with the given name, and start to follow them.
        """
        return False

    @trace_instance
    def unfollow(self, name):
        """
        Find the user with the given name, and unfollow them.
        """
        return False

    @trace_instance
    def send_dm(self, recip, content):
        """
        Send a direct message with the given content to the specified
        recipient.
        """
        return False

    @trace_instance
    def read_random(self):
        """
        Read a random posting from the feed.
        """
        return False

    @trace_instance
    def comment(self, content):
        """
        Add a comment to the currently read post a.k.a. reply to it.
        """
        return False
To aid with that last set of overrides, often there will be an abstract class to provide implementations of the application regardless of the platform it is on. For this example, we expect the sequence of actions to use Mastodon to be the same whether we’re on Win 7 or Win 10, and whether we’re using Firefox or Chrome. The images might look a little different on each of those, but the logic of how to accomplish it won’t change.
The very bottom concrete classes often do little more than point to the directory of image regions for this specific combination of platform choices. It will also inherit from whatever platform and/or office suite it belongs to. That lets it get all the default images and functionality for that system as well. Here then is our concrete Mastodon class using Chrome 63 on Windows 7:
# Copyright (c) 2021 Skaion Corporation, www.skaion.com

"""
MastodonChrome63Win7
--------------------

This module provides a class to drive a Mastodon_ using Chrome 63 on a
Windows 7 system.

.. _Mastodon: https://mastodon.social/about
   """

# 3rd party/standard library
import os

# our imports
import Chrome63Win7
import ChromeWindows7Window
import Tester

from Mastodon import Mastodon
from Windows7 import Windows7

TYPE = 'mastodonChrome63Win7'
HUMAN_TYPE = 'Mastodon via Chrome 63 on Win 7'


UNITTEST_CRITERIA = {
    Tester.PLATFORM: Tester.WIN10,
    Tester.APPS: [Tester.CHROME63],
    Tester.SERVICE: [Tester.MASTODON],
}


class MastodonChrome63Win7(Mastodon, Windows7):
    """
    Provide the right paths and any specific overriding implementations
    to driving a Mastodon site using Chrome 63 on Windows 10.
    """
    def __init__(self, system, config):
        # have to set browser type before we init our parents
        self._browser_type = Chrome63Win7.TYPE

        super(MastodonChrome63Win7, self).__init__(system, config)

        self._region_path.insert(0, os.path.join('microBlog',
            'mastodon', 'win7', 'chrome63'))

        self._window_class = ChromeWindows7Window.TYPE

        self._preload_images()


def test(properties=(), skip_args=False):
    """
    Run the unittest for MicroBlog using the class provided in this
    module.
    """
    import MicroBlogTester

    return MicroBlogTester.test(TYPE, properties, 'default', skip_args)

if __name__ == '__main__':
    test()
Obviously, most of that is not yet implemented, but we can still run it to see which parts do already work, because we inherit from WebAppImpl for example.
As we can see there, ConsoleUser is able to open the browser and navigate to the site. It fails to enter the username correctly, but does find the login button afterward. Because the login step failed (it couldn’t find the image it sees when it is logged in), the rest of the test is aborted.
We can fix that by providing our own advance_to_username_field in
the Mastodon class. This can be fairly simple as we want to make
sure we click beside the match, not within it (which might sometimes
even work). Here’s our version to override the default:
@trace_instance
def advance_to_username_field(self):
    """
    The loginNameField for this class is a label beside the area to
    click.  This will click the adjacent spot and set focus to the
    proper field.
    """
    return self.wait_for(self.window.select_field,
            (self._login_name_field,), 5)
Running it again after that shows it can now login, though sending a new post or reading a message fail. It doesn’t exit until the reading fails though, because that is the step that has to work before the subsequent steps are able to work.
Another thing we can notice now that we log in, is that there is not always a single image we can use to see if the user is logged in, because the menu items get highlighted when they’re active. Fortunately, the method that we call to look for patterns on the screen accepts lists, not just single regions. We’ll have Mastodon replace the variable we search for with a list of several options like so:
@trace_instance
def _preload_images(self):
    """
    Load the images we're likely to need while operating so we don't have to
    get them later.
    """
    super(Mastodon, self)._prelaod_images()

    # we need to add to the logged in region a few options since we
    # cannot be sure which menu will be highlighted for example
    self._logged_in_region = (
        self._logged_in_region,
        self._images[NEW_POST],
        self._images[APP_MENU],
        self._images[APP_MENU_SELECTED],
    )
Now we can continue repeating running the unittest, fixing each failed step–often by writing the method at all. In the end, we come up with:
1.4.6. Some Challenges
One thing that often comes up is finding that there are subtle changes as an application runs that aren’t always immediately obvious. While developing the Mastodon app an example of that came up when using the search capability.
The first discovery was that search terms are preserved across visits to that tab. That is, if we search for a user, then click on Home for example, then click back to Search, the users name will still be there along with the results. This means we cannot expect the blank search area box each time we go to the tab, and have to capture some extra images to get the “X” at the end of the text area to clear it. And that can have different appearances of its own depending on whether the search box has focus or not.
Issues of that sort are common while developing. That’s why when I ran
the capture tool initially I gave it a -1- suffix, because I knew I
would be capturing more sets and I wanted to keep them separate and
easy to find.
The other on-going challenge is getting the images we capture just right. ConsoleUser is going to click within the matched area, so if that area includes some of the surrounding space, some of the clicks may fall into that “outside” area. When that happens, ConsoleUser will have found the right spot, but not actually accomplish whatever the click was supposed to do (like submit a post).
Getting the images right can take some time and is a bit of an art as we want to be sure we have enough of the screen to make the match unique to where we want to click, but also small enough to ensure we are in the right spot when we do click.